Community Archive
Spira's Summoner Soloing Guide
| This Article is a Community Guide |
|---|
| Guides exist as a community effort to help fellow players navigate the game. Opinions and strategies in their content may vary from editor to editor, but feel free to add new or correct out of date information. Guides are subject to the same editing standards of other FFXIclopedia articles. |
cached copy reposted here for availability
Spira's Summoner Soloing and Astralburn Encyclopedia -Spira of Ragnarok Server
Introduction to Soloing & Astralburn
SMN don't always get invited to parties, but aren't confined to sitting around and waiting. Summoner, being a pet-based job, can also solo their EXP effectively. There are 2 general ways with which SMN can solo but the mechanic that makes this all possible is the avatar instinct where your avatar will immediately head and attack the mob that has aggro on you. Please note: SMN soloing is not for everyone. Soloing usually come with big risks of potential death and may not be suited for people who cannot handle tight situations when they occur. However, the payoff from being able to solo makes up for the effort put into it. As the saying goes, No Risk No Gain. The same principle applies here.
Why Solo? The reason depends on the player. Soloing saves time looking for parties (or avoiding bad ones), or if you cannot party due to time constraints or have to AFK frequently, soloing would be for you. Soloing allows you to play at your own pace on your own time. You can choose to start when you like and stop when you want. Considering it's a 1 man effort, the exp gained from it is a handsome reward. One main drawback with soloing, however, would be its inconsistent EXP rate. This is especially the case with the mobs that self-destruct. The EXP rate can vary anywhere from 3k-6k/hr. (without ring or sanction)
Astralburn parties are PTs made with the Summoner in mind. These are usually either all Summoner PTs or consist of mainly SMN with a refresher (and not necessarily 6 man). The reason why I have appended Astralburn into this soloing guide is because a majority of mobs that Astralburn PTs seek out are the same as that which SMN solo. Information is still mainly focused on soloing tactics, but for those which are suitable for Astralburn, notes will be highlighted in [purple]this color[/purple].[hr]
The 1st basis of SMN soloing - SMN, through the use of expendable avatars, have a natural job advantage in dealing with mobs that self-destruct (while causing massive amount of typically fatal damage), whilst staying unharmed or at a safe distance. This is the 1st basis of SMN soloing, by surviving against mobs that kill themselves or are unable to harm the SMN due to a distance factor. [purple]Astralburn: For mobs that SMN can solo by the 1st basis, it is also possible to kill them with 2-6 SMN as well. There is no need for refreshers in such PTs and because of the strength in numbers, the delicate hate between avatars and their masters is not as big an issue to take note of.[/purple]
The 2nd basis of SMN soloing - Post Level 65, the SMN job evolves into somewhat of a heavy spike damage job class, with their Lv65 and 70 damage blood pacts dealing upwards of 1k damage with relative ease. By exploiting this advantage, SMN are able to solo mobs that have short HP or have weakness to such blood pacts [purple]Astralburn: For mobs that SMN can solo by the 2nd basis, it is recommended that they kill these in groups of SMN with some form of a support jobs who can give refresh. This is due to the MP-intensive nature of the Lv65/70 Bloodpacts and helps to reduce downtime.[/purple][hr]
[sea]1st Basis Soloing[/sea]
The Basics
Soloing Requirements:
Free or nearly-free Carbuncle. SMN need enough MP to keep Carbuncle out for as long as possible. With free Carbuncle, that would mean the SMN could last for an incredibly long time and greatly reduce the downtime between each mob for need of MP. Not having free Carbuncle is also feasible, but you must be prepared to rest at regular intervals and make sure you do not take on mobs with insufficient MP as the duration of battle is unpredictable. (Note: Free Carbuncle is only easily possible from Lv51 and above, but before then, working with Carbuncle Mitts might suffice.)
Equipment Requirements:
Any set of eq that gives free Carbuncle. The most common set would be Light Staff + Carbuncle Mitts from Lv51. Carbuncle Mitts is the most vital piece of EQ to do this, so you will want this. Achieving 0 mp/tic on Carbuncle is sufficient enough, but if you can get a Vermillion Cloak / Yinyang Robe and gain 1mp/tic with Carbuncle out, that would extend your soloability indefinitely. Once again, it is possible to do this without free Carbuncle, but the risk is somewhat higher especially if you run out of MP, so try your best to reduce it as much as you can.
Latent Refresh from Sanction or Sigil is also a welcome bonus but not necessary if you are dealing with free Carbuncle and low MP costs already.
In addition to this, it is also helpful to go for EQ that have "Enmity -" or "Avatar: Enmity +". Avoid EQ that give the opposite effects. (ie. EQ such as AF Horn or Doublet) The reason for this? Emnity - means that after Carby is dead and the bomb is heading for you, the 'claim hate' that makes the bomb come for you is lesser, so Carby can snatch it from you easier. Also, "Avatar: Enmity -" is not useful here because this is a solo situation and any less hate on the avatar will potentially mean more hate for yourself. (note: all AF gear contain "Avatar: Enmity -". Those that don't are due to translation error. In either case, keeping the Pigaches on is fine with soloing because they give your avatar added Accuracy which can help your avatar build TP on the mob faster.) EQ that affect enmity - direct link to somepage
Finally, elemental resistance equipment (especially fire) may help you if you're caught in the wrong place at the wrong time and end up taking damage from strong aoes. Water or Fire staves help when soloing bombs and snolls especially. However, you should note that you need to stack a substantial amount of elemental resistance before you can see any obvious effects.
Environmental Factors:
The most important factor is having enough space to run far enough from Carbuncle that you cannot see his HP bar anymore, and a little bit more than that. The zones you choose to solo in should also not have other things that can easily aggro you and kill you in the process. At the very least, the location where you solo needs to have at least enough space for 2 Carby-kiting positions. [purple]Astralburn: Space isn't as much of a constraint but enough room to do at least 2 positions is still ideal[/purple]
Technique: Carby-kiting
I'd like to believe I was the one who kinda invented this term, but if not then whatever. The concept of Carby-kiting is to kite something through repeated castings of Carbuncle (or other avatars). The reason why we commonly choose Carbuncle is because his perp. cost is lowest, of course. By summoning from a distance the moment Carbuncle is dead (and with the mob hate on you), Carbuncle will automatically head for the mob and attack, buying you time to run to your next kiting position.
Soloing mobs by Carby-kiting in 10 Easy Steps:
1) Go to a safe spot.
2) Summon Carbuncle.
3) Run near to the mob.
4) /ja Assault your mob.
5) Run away until you cannot see Carbuncle's HP bar anymore.
6) Run a slight bit more.
7) Stop.
8) Wait for Carbuncle to die. (Carbuncle's name where the pet HP bar is will disappear)
9) /ma Carbuncle (recast Carbuncle) Carbuncle will automatically run towards the mob and attempt engage it.
10) Repeat steps 5-10 until the mob is dead.
[purple]Astralburn: It is difficult to simply Carby-kite in Astralburn because hate bounces between players and when the mob does not have main hate on you, your Carbuncle will NOT automatically attempt to attack the mob. Fighting such mobs with 2 or more summoners is basically speeding up the process because you are feed them more TP in the same amount of time. It also makes it safer for players to recast avatars because they do not have to worry about the mob chasing them down while doing so.[/purple]
How to know if the mob is dead?
1) Carbuncle will run back to you with a little life left. This means the mob blew up and didn't kill him.
2) Carbuncle dies. You resummon him and instead of running away he stays by your side. This means the mob died, and Carby died from the blast.
3) You see it die from a distance while running from it. Or you see the blow up WS in the log. At that point just run from it, the range isn't that big.
4) The obvious "Playername gains XXX experience points" or "You are too far to gain experience points" will show in your log. If it's the 2nd, it means you are indeed too far.
5) If you are at full inventory and the mob drops any item, the treasure chest symbol will appear above your name at the bottom right of the screen.
In rare cases, Carbuncle will run back to you but the mob did not die, meaning that it somehow lost interest in you or depopped. This isn't supposed to happen so I would consider it a glitch. However, if you encounter this, you are safe as the mob will not chase after you until you aggro it again.
Also, just because you see the blow-up WS it doesn't mean you can dismiss Carby straight away. That will glitch the mob's TP move. The mob would be alive (and may keep its TP), your Carby gone and you'd be left in grave danger.
Soloing Notes
> FFXI has a certain Summoner job glitch that even after Carby is dead you wont be able to summon an avatar for a while. Also, if Carbuncle dies too quickly before his recast timer is up, this is what you should do. Instead of calling for Carby, call an elemental spirit (preferably the cheapest perpetuation cost one for you - for me its Light Spirit) because you wont have enough time to cast Carbuncle before the mob gets too close, or in magic-aggro range. Use it to tank just like Carby would, run to your next spot where you would cast, release the spirit and then recast Carby for MP efficiency. This would be safer than if you cast Carby after the lag period, and it gains hate with the mob, and it'll come for you first each subsequent time you recast Carby.[hr]
I - Bombs & Snolls
Snolls require access to Chains of Promathia areas.
The prime targets for SMN to solo under the 1st basis are Bombs and Snolls. The reason why these 2 mobs are grouped together is because they are effectively the same mob. For Djinn, see the section below this. Because bombs/snoll are the favoured targets by most SMN, I will elaborate on them in most detail. Carby-kiting is essentially how SMN solo bombs/snolls here. It does not take that many rounds of Carby-kiting to down a bomb/snoll because they tend to blow up rather frequently. However, the TP move they use is still based solely on luck.
Technique: Magic-Aggro Pull
When your pull area has sight aggro mobs that you wish to avoid, it is hard to assault Carby without getting extra aggro. You can go about pulling the bomb by magic-aggro. Since your invis will only drop once the spell completes casting, by aggroing the mob while casting and then interrupting it, you can perform magic-aggro pull.
1) Cast Carbuncle and then cast Invisible on yourself. 2) Run to the pull area. 3) Cast a long spell and run around so that it interrupts (I recommend Stoneskin or any Tele-spell) The bomb should have aggroed at this point, and Carby will proceed to auto-attack. 4) Run back to next kiting/recast position.
Dangers: Magic aggro is non-specific. Make sure there is only 1 Bomb (or any other arcana) in your radius when you pull. Doing this also gains a slight bit of extra hate with the bomb, so the bomb may not go for Carby immediately on the next few castings.
Soloing Notes:
Bomb types have 3 to 4 TP moves (depends on which expansion area), Snoll type have 4. The TP move you'll want them to do are as follows: Bomb - Self-Destruct (AoE fire-based damage) Snoll - Hypothermal Combustion (AoE ice-based damage) The amount of damage from both these attacks depend on the mobs remaining HP. Snolls are relatively weaker than Bombs cos they dont Berserk as much, so your Carby can last more hits.
If you get aggro from the bomb (meaning that after Carby dies, and you resummon and it hits you before Carby can attack it. OR if Carby misses and it comes for you cos you have hate) don't run from the bomb. Let Carby steal the hate from you with its attacks. Having blink at this point is very useful. If you absolutely cannot afford to wait, get Carby to Meteorite (Lv55) to gain hate, but try not to do this as much as it will build more hate on you in the long run.
If you have never gotten hate on yourself from the bomb directly (like casting magic or performing any move close to it), each time you cast Carbuncle, the hate that is gained from Carbuncle simply going to attack the bomb is enough to make the Bomb head for Carby first instead of you. It may not make sense here, but if you have soloed them its easier to understand.
If you manage to get hit by Cold Wave at least once on a particular Snoll, then you already have gotten hate on yourself from the bomb directly. It will take a while to shed this hate during subsequent castings so you'll need to prepare yourself for this. Also, the Frost DoT from Cold Wave is quite deadly. You should have the Erase spell, Stoneskin, Regen or Au Laits to counter this.
Bombs and Snoll are Arcana. They aggro sight (but are quite blind) and magic. They also do not link.
Do not mistake Bomb Clusters for bombs as they are an entirely different kind of bomb which blow up far less frequently. In addition, the bombs in Aht Urhgan areas are not solo friendly because they can cast powerful magic and the area around them is quite hostile. Djinn are another type of bomb which have a section dedicated to them below.
(Djuwal wrote this (with slight spelling corrections):) Ever since the MPK patch I've noticed that the mobs I've been fighting will despawn in the middle of a kite session, but I think I've figured out why. Let's see if I can explain this right, though: I'm in the middle of a kite session with a Moro and somehow I get hate. Take a little damage, but then Carby gets hate back (usually after the Moro hits me twice - unless Berserk is on, then that just sucks). Run away, resummon when Carby is dead, and if I'm lucky Carby will have hate back, if not I'll get pounded again a couple of times and then Carby will get the hate back on him. Now, let's say I have a straight run where I don't have to pass the Moro on the next kite. If I summon Carbuncle and then run away, but notice that the Moro is chasing me (Carby's hp won't be diminishing, so I'll know by that) but I keep running, and eventually Carbie gets hate back (I think he runs a little faster than the Moro) before the Moro is able to hit me. If the Moro doesn't explode on this round...it will despawn. So, the rule is, if you have hate, make sure the snoll/bomb hits you before running away, because if it doesn't it will despawn if Carbuncle gets hate back before it's able to hit you.
Recommended Spots
(Note the Lv range indicated is the recommended range for your level and not the mobs. You'll notice it begins at 51 because that's the Lv that Carby becomes free.) You may find you can fight the mobs earlier than the level ranges I have suggested but the fights will be harder and may take longer - which should not be a problem if you're skilled enough. Go ahead and fight the bombs earlier if you're confident in your soloing abilities. Also note, there are other bombs that I have not listed that some people have preferred to go to (such as Explosures, Snowballs, etc) because I personally do not recommend those, but they will be listed in the link below. [purple]Astralburn: SMN can group together and kill these bombs at a lower range than recommended for solo but there is no need to go too low as exp will still be capped[/purple]
Lv 51-56 - Hellmines @ Garlaige Citadel - Next to Serket's Room
Dangers: The beetles, bats and undead around the area aggro. Magic pots can be found in the corners of Serket's room and Thunder Elementals spawn somewhere close by in weather.
There are 4 Hellmines to pull from. BST typically solo here too. Keep up sneak when you pull to avoid the undead. Steer away from beetles when you kite and you should do fine.
Lv 52-61 - Volcanic Gas @ Ifrit's Cauldron Dangers: Dire Bats (aggro sound, spawn at night)
The 1st popular bomb soloing zone. Bombs from the left and right entrance vary in level. Some BST tend to solo on the bombs at the left entrance where there are things for them to charm. Bats do not pop in the tunnels and around the crater.
- side note: There are Mining Points around there too, but DO NOT MINE while still kiting the bomb. Any interaction with NPC auto-retreats avatars.
Lv 52-61 - Snoll @ Uleguerand Range (requires CoP) Dangers: Uleguerand Tiger (aggro sight), Cwn Awwn (aggro sound and HP, spawn at night). Buffaloes in the valley. Ice Elementals in the valley during Ice Weather.
The popular snoll soloing zone. Snolls can be found not too far from the entrance zone, and also in the valley area after falling from Thousandfall Ridge. Uleguerand Tigers are roaming all the time, and its possible to magic-aggro pull the snoll to a stretch of safer area such as the area leading to the tunnel with bats, the long entrance path, or the path leading into the valley.
Lv 62-66 - Morozko @ Uleguerand Range (requires CoP) Dangers: Nival Raptors (sound), Brontotaurs (true sight) Succubus Bats (sound)
Since a recent patch they shifted most of the snolls down 1 'tier' in this zone. You can find Morozko just before the 2nd tunnelway on the way to the summit. There is a tunnel here where you can carby-kite pretty decently. Also, there are no more bats inside the tunnel so you can continue kiting through into the cave. If you do accidentally aggro Brontotaurs, stall using an avatar and run far away. Using Deodorize at a distance may help to lose aggro.
Lv 66-73 - Volcanic Bomb @ Ifrit's Cauldron Dangers: Nightmare Bats
There are many areas in IC where Volcanic Bombs spawn. They can be found deeper in, near Cloister of Flames zone, and around the Ash Dragon. There is a slight space constraint here, and most spots are easier duo/trioed. BST competition alert.
Lv 66-69 - Akselloak @ Uleguerand Range (requires CoP) Dangers: Tyrannotaur, Demons
The Akselloak camp has been greatly nerfed since the patch. There is only 1 safe spot to Carby-Kite the Akselloak (that being the old Morozko camp), or you can risk it by kiting in the open slope area in between the 2 Akselloak spawns. Unfortunately Akselloaks are not feasible as good solo EXP anymore. For a better solo spot in this Lv range, refer to the Djinns section. [purple]Astralburn: There are more Akselloak but they come in very inconvenient spots. Having an Astralburn reduces the need for kiting space so you can consider these.[/purple]
Lv 70-75 - Agloolik @ Uleguerand Range (requires CoP)
Area 1 > Dangers: Demons, Evil Eyes, Taurus, Ice Elemental This camp is the OLD Akselloak camp where Akselloak's used to pop, located at (H-6). It is the nearest of the Agloolik camps to get to, though they are of limited supply. The pull area is especially dangerous, but the kite area is a very long open tunnel path which is aggro free. You may need Sneak/Invis when pulling in this camp.
Area 2 > Dangers: Ice Elementals in Ice weather. King Buffalos outside kiting area (low risk). AKA the frozen lake at (H-8). This is the best camp of them all. There are 4 Aglooliks for you to pull from and the pulling area is the safest of them all. You can pull without sneak/invis.
Area 3 > Dangers: space constraint When there is no weather effect, there is a tunnel you can run into from the lake at (H-8) which will lead you to the Brothers ENM zone to Bearclaw Pinnacle. There are 2-3 Aglooliks in these tunnels which you can kill. However, there is also a space constraint here, so exercise caution. (Or zone to safety.)
[purple]Astralburn: Area 4> Dangers: Jormungand, Ice Elemental If your party sets up camp at the tunnel leading to the King Buffalos and the frozen lake at (G-8), you can pull the Agloolik that pop around Jormungand, there are plenty.[/purple]
Bombs - Somepage listing
Snolls - Somepage listing
Map References
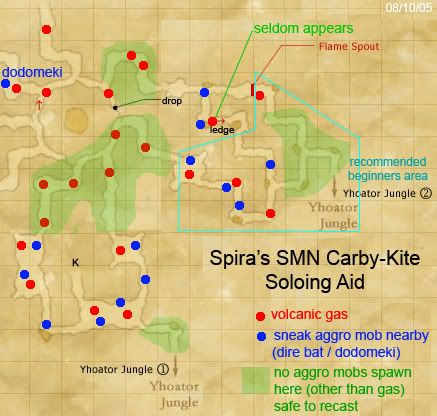
Ifrit's Cauldron
This map is made by combining the 3 maps that are connected where Volcanic Gas spawn.. (primarily near the entrance area). Beginners should start in the area enclosed in the cyan box, then can proceed to the area near the Yhoator Jungle (1) exit. More experienced players can move on into the tunnel area (which is actually that big area highlighted in green). Few people would go on beyond the flame spout, but I also indicated the gas mobs there for general reference.
Map with recommended recast areas, courtesy of Tomiko

Uleguerand Range
I've chosen to show the recommended kiting areas as opposed to all possible areas and also indicated the snoll families around those kiting areas with the colored dots. This does not imply those are the only snoll mobs of that type in the zone.[hr]
[sea]II - Djinn[/sea]
Djinn requires access to Wings of the Goddess areas.
Djinn are almost identical to Bombs and Snolls. They are greyish-black in color and also self-destruct. However, because the means by which they blow up is different from Bombs and Snolls they have been given their own section. Djinn are unique because you have to 'set' them to get them to blow up. This can be done by dealing any form of elemental damage to it corresponding to the current day (eg. Stone on Earthsday)
Djinn have since been nerfed by SE so that they won’t only use their self-destruct move when you set them and feed them TP. However, this does not mean you cannot still kill them using this method. Whilst they are no longer the supreme EXP vaults they used to be, they can still be used as viable EXP targets. As I have no personal experiences with Djinn since the nerf, I cannot offer up to that extent. However, I have reinstated a slightly edited ‘pre-nerf’ guide at request as they may still be of some use to players. Also, I have included information provided by Yajirobe. Thanks.
Technique: Setting the Djinn
As a summoner, you will have many tools to allow you to set the Djinn to add Nocturnal Combustion to its TP movelist. At the same time, these are the same moves that help speeden up fights with them as they gain extreme amounts of TP when hit with an elemental attack of the same day, enough to use a TP move immediately. This is in addition to setting them. These moves are mainly your BP: Rage nukes and spikes Wards. Because of the reliance on these avatars, it is advisable to use the Celestial avatar of the day primarily when fighting Djinn. Only 1 elemental attack is required to set the bomb per TP move. Note: It has been reported that the Djinn has to be the target of the elemental attack, and will not be set if it were a secondary target of AoE or -ga moves.
If the element of the day is Fire, Thunder, Wind, Water, Earth or Ice, Tier II nukes are sufficient. Also, Tier I nukes from /RDM work. Elemental Ninjutsu and Elemental-based weapon skills (not that you will want to use this) work too. Enspells also work. If it is Lightsday or Darkday, Meteorite and Nether Blast work well. Somnolence should also work. Also, Dia and Bio are more MP efficient, and work. However, since the nerf, it has been suggested that Djinn are only safe/good exp targets during Iceday and Thunderdays, which is the day when you can use Shiva's and Ramuh's spikes Wards to effectively feed it TP so rapidly that it will blow up very quickly.
Soloing Djinn:
As soloing this mob is very flexible, there are a few options you can try.
1) Summon the avatar of the day. 2) Move within considerable distance of a Djinn (almost close enough for the BP you will be using to be in range) 3) Activate Blood Pact: Rage on the Djinn. (The Djinn will respond to aggro and head towards you. The BP will land, and draw hate from the Djinn. The Djinn is now "set")
Option A (forcing the TP move): 4) Run away. Around 18" is sufficient. 5) Cast a nuke according to current elemental day. With this option, you are required to have a subjob like RDM, BLM or NIN (It is best to do this at maximum casting distance 21.5". This is beyond magic-aggro distance, in case other Djinn are nearby.) 6) Run if the Djinn starts running toward you. 7) The Djinn will use a TP move very soon.
Option B (waiting it out): 4) Run away to a distance a little further than when the avatars HP bar disappears. 5) Wait for the avatar to die. (Djinn may have blown up by this point) 6) Recast any avatar that can Carby-kite the Djinn until it blows up.
Note: I have not received reports stating whether or not you need to set the Djinn again if its TP move after the first setting is not Nocturnal Combustion. However, if you choose to set it again, it will gain a substantial TP boost which helps to speeden up the process of killing it, but at the expense of hate issues.
Ramuh and Shiva on Thundersday and Iceday: As Ramuh and Shiva are able to cast Shock Spikes and Ice Spikes on themselves, and deliver rapid continuous elemental attacks, they are the MOST EFFICIENT avatars to use when fighting Djinn.
1) Summon Shiva or Ramuh on their corresponding day. 2) Move within considerable distance of a Djinn. 3) Activate Blood Pact: Ward for the Spikes buff. 4) Assault the avatar on the Djinn. 5) Make sure you are out of blast radius. 6) The Djinn will use a TP move very soon.
Yajirobe notes that you should cancel the spikes on your own self so that you will not be able to feed the Djinn TP if it comes to attack you. This helps to prevent unnecessary death from the self-destruct move.
[purple]Astralburn: Djinn are faster to kill for Astralburn parties as you have more tools to build TP on the Djinn and set them faster – thus allowing them to blow up faster. It is also safer as the mobs hate will be split.[/purple]
Soloing Notes:
> Djinn have around 4 TP moves. Their self-destruct move is known as Nocturnal Combustion, but they will NEVER use this move unless you have "set" them to.
> Any form of elemental damage attack corresponding to the current day will feed the Djinn TP and its next TP move could be Nocturnal Combustion (AoE HP-based Dark (i guess). It also gives them enough TP to use it immediately, so you must be out of range once you have "set" the Djinn.
> Additional elemental damage attacks beyond the first will simply speed up the rate at which it will use TP moves. In fact, when hit by a second elemental attack, Djinn will almost always respond with a TP move immediately. 1 theory to this is that each elemental attack gives the mob 100% TP, and by the 2nd elemental attack, together with physical attacks dealt or received, the total TP comes up to 300%, whereby the mob is forced to use the TP move.
> The best days to fight Djinn are Thundersday and Iceday, when you are able to use Ramuh and Shiva with their respective spikes wards.
> Nocturnal Combustion is a very punishing TP move. If you get hit by it, you're almost certain to die. Stoneskin is as good as useless.
> Fighting Djinn can be MP intensive as you are using celestial avatars. Always start fights with sufficient MP and switch to Carbuncle as a last resort.
> There are 2 important points to take note of when you solo Djinn. Firstly, you do not want hate, and secondly, you do not want to be near the Djinn. Having as much Enmity reduction gear helps this alot.
> Note day changes. If day changes in the middle of a battle, change your avatar accordingly.
> Do remember to get Sigil before heading out to these camps for the EXP bonus it gives.
Recommended Spots
The number of viable camps for this mob is still being investigated as the areas are relatively new. There is a possibility of a soloing spot in Batallia downs.
Lv 65-70 - Ignis Djinn @ Vunkerl Inlet {S} (requires WotG)
The repops here are ~5min each. EXP drops considerably at 70 because that is the point when the Djinn here start checking as Even Match. Additional note: It is entirely possible to solo Djinn at an earlier level than 65+. The fact that you can forcefeed TP to the Djinn greatly reduces the risks faced if dealing with the mob at a lower level.
Area 1> Dangers: Bugard (for the lower 2 Djinn) Around (G-5), there is an area where 6 Ignis Djinn hang out. This is one of the best camps here as there is a very safe kiting area (if necessary) next to it. The Robber Crabs do not aggro. BST competition alert: BST/RDM from 65+ are able to charm Robber Crabs and Fierce Smilodon to solo in this camp too. This is provided if they can still solo these effectively since the nerf. If you get killed, there is a Sprite who paths around that area and can R3 you, so that is an added advantage.
Area 2> Dangers: Orcs (are entirely avoidable, quite far away) At (D-11) there is another cluster of around 7 Djinns. This is very close to the zoneline and has sufficient space to work with.
Not-so-recommended Areas 1> Dangers: Gigas Nearest to the Campaign tele NPC at (I-9), there are a bunch of Ignis Djinn around a tower but not as many as Area 1. There are Gigas nearby and there isn't that much space to kite. This area is not as recommended. Magic-Aggro pull may be necessary. Area 1 and 2 is definitely better.
Not-so-recommended Areas 2> Dangers: Gigas, Dire Bat Near (J-6), behind the Cyclopean Gate. There is a tunnel that leads to an area full of Gigas and Djinn. 1 Dire Bat lurks in the tunnel but is easily avoidable. Similar to the previous area, the Djinn are mixed into the Gigas, you may need to Magic-Aggro pull them under invis. I would only recommend this spot as a last resort.
Not-so-recommended Areas 3> Dangers: Orc, Treant At (F-11) there is a bunch of Djinn mixed in with Orcs and Treants, they aren't that close together but I'd wager there are around 8 of them. There is no good reason to come here considering there are much better camps available.
[purple]Astralburn: Don't come here in groups if you're in the late 60s as EXP will drop considerably, plus you'll be waiting for repops very often. Just a rough estimate, but 60-67 for duo/trio groups is probably optimal. Also, Thundersday and Iceday is your friend.[/purple]
Lv 65-70 - Ignis Djinn @ The Eldieme Necropolis {S} (requires WotG) Dangers: Ignis Djinn
There are 2 connected rooms underground in The Eldieme Necropolis {S}, where 16 Ignis Djinn roam around together, with no undead very close by. These are of the same level as the ones in Vunkerl. There is little to no kiting room here, so I DO NOT recommend coming here if you're soloing. However, if you are coming as a group, Eldieme's Djinn camp may prove to be ideal for you, especially on Thunday and Iceday.
[purple]Astralburn: The camp is located at (J-11) to (K-12). I'll leave it to you to figure out how you want to get there because I think there's more than 1 way. This is best done in a duo or trio group, and you will need to keep RR up because mistakes here will definitely cost you your life. However, if you have experience with killing Djinn already, this camp is highly rewarding. You get 16 pops in this camp and although they do take longer to repop, you will only need to wait long if you're killing faster than 1 mob per minute. Quite like roaming camps, as long as you keep killing, you will gradually open up more space for safe recasting, kiting or healing where necessary. [/purple]
Map References:
Vunkerl Inlet {S} (IMG:http://i20.photobucket.com/albums/b201/spira/summoner/vunkerldjinn.jpg) This map shows the possible areas you can go to solo Djinn (tho not all are advisable areas, see above for details), as well as the path to take if you're heading there from the Campaign Tele NPC or zone. The names of mobs near the hotspots is there to indicate some of the dangers you may face when you camp in those spots. It is somewhat based on MerylStryfe's map on Alla.
The Eldieme Necropolis {S} (IMG:http://i20.photobucket.com/albums/b201/spira/summoner/eldiemedjinn.jpg) This map is pretty straightforward in that it shows you where to find the Ignis Djinn. The blue spots are not big enough to serve as kiting areas but more so as places for you to rest or recast. [hr]
As for the other mobs I've listed, I don't recomment them as much as bombs/snoll/djinn for solo (cept maybe goblins) and they are mostly suited for Astralburn if at all being practical for killing. They should be taken at a lower check level than bombs/snoll, usually EM to low VT.
[sea]III - Goblins[/sea]
Unlike bombs, Goblins are of huge abundance across Vana'diel and available at probably every conceivable level. The pros about these guys is that Bomb Toss sometimes 1-shots the mob and gives you quick exp. The downside is that if the Bomb Toss doesnt kill the Gobby but does kill Carby, you have to be prepared. You don't want them to be too tough for Carby to handle because as their levels increase, Goblins tend to have pretty strong attack power.
Soloing Notes:
> Goblins have a variety of TP moves and spells, depending on their job, but all of them have the TP move you'll want them to do to kill themselves, which is called Bomb Toss (AoE fire based damage). This TP move does NOT always kill the goblin off so it'll require a fair bit of luck.
> It is usually better to Carby-kite goblins. Their Bomb Toss can be fatal as it can trigger at any HP % on the Goblin. The amount of damage depend on the gobbies remaining HP.
> As Goblin are beastmen, they have many job types. Try to avoid mages that can negate damage through stoneskin and THF goblins which have such high accuracy that Carby has a problem hitting them. Also, do not choose gobbies that are too high above your level as they will not only kill Carby quickly but Carby will have problems holding hate with them.
> All Goblins aggro and link. There may be a need to Carby-pull the mob you wish to solo. Some Goblins (BST type) have pets which link to their master too, so exercise caution before pulling them.
> These are usually the best types of mobs to solo or astralburn between Lv25 to 50.
Recommended Spots:
Altepa Desert Outpost Goblins - Somepage listing[hr]
[sea]IV - Bees[/sea]
Bees are relatively easier to kill, but can potentially take longer depending on how often they do Pollen. Bees can also be found all over Vana'diel at various Lv ranges but are best killed at lower levels. Final Sting being a single-target move makes it possible for you to melee alongside your Carby instead of Carby-kiting, making sure hate is on Carby all the time. (I do not recommend Bees at all, but since they have a self-destructive TP move, I thought I'd include this in too)
Soloing Notes:
> Bee's self-destruct move is Final Sting (single target) and always kills the bee. Damage dealt is based on its remaining HP. It often triggers anytime when the bee is less than 50% HP.
> Of the other TP moves that Bee's have, the one to look out for is Pollen as it's a ver unfair healing move that will keep the bee's HP above 50% and prolong your fight.
> Bees often link and some aggro. They can all heal themselves through Pollen.
Recommended Spots:
Crawler's Nest Bees - Somepage listing[hr]
[sea]V - Dolls[/sea]
The last of the exploding series of mobs. Dolls are quite dangerous to kill. Like bombs, they are arcana and aggro to magic, so their camp spots are usually relatively dangerous for a carby-kiting Summoner. Dolls are not that easy to find and are relatively harder to kill due to a considerable array of TP moves they have at their disposal.
Soloing Notes:
> Dolls self-destruct move is Meltdown (AoE fire-based damage) which always kills the doll. Damage dealt based on its remaining HP.
> A drawback to killing dolls is that Meltdown rarely triggers, if at all.
> Avoid Ro'Maeve for soloing dolls if you want to live. That place is aggro heaven for SMN since everything aggros to magic.
> Dolls being arcana aggro magic. The ones in the alcoves in Ru'Aun Gardens aggro sight.
> Dolls are decent targets for 2nd Basis Soloing.
Recommended Spots:
Delkfutt Tower Ru'Aun Gardens Dolls - Somepage listing[hr]
[sea]VI - Worms[/sea]
These mobs are different from all the previous mobs that SMN can solo under the 1st basis in that you HAVE to kill them completely. The only reason why SMN can solo these is because they attack with their pets and the mob cannot really reach the SMN to kill him off. Worms are stationary after all. Soloing worms is easy at low levels but becomes a dreadfully slow way to gain EXP later on.
Soloing Notes:
> Worms cannot be Carby-kited since they do not move. They can however, be Carby-throwed (lol), since the entire process of killing them is simply throwing Carbuncle after Carbuncle at them until they die.
> Be sure to run out of the worms casting range. Simply summoning Carbuncle after he dies is enough as the worm hate will cause him to auto-attack. Doing this is actually rather brainless. You may however need drinks to sustain your Carbuncle as chances are you are soloing this at a level that Carbuncle isn't free.
> Worms link and some aggro. They can bind and silence and the ones at higher levels all have access to strong earth-based magic spells.
> Worms are amongst the best targets to solo or astralburn on from Lv10-25
Recommended Spots:
Gustaberg Region King Ranperre's Tomb Korroloka Tunnel Attohwa Chasm Worms - Somepage listing[hr]
[sea]2nd Basis Soloing[/sea]
The Basics
Soloing Requirement:
Lv65+. Access to Lv65 or Lv70 Blood Pacts is a must for these mobs. Needless to say, you'd need the standard set of avatars to pull it off. If you are doing this at Lv65, you must have Fenrir. No other avatar will work.
Equipment Requirements:
There are no real requirements, but maximum perpetuation reduction gear helps alot. This includes stuff like HQ elemental staves and EQ that gives refresh. Also, try to use gear that increase the effectiveness of avatar physical accuracy or attack. [purple]Astralburn: Refresh always helps in these PTs. hMP gear is also welcome when you rest in between pulls or mobs.[/purple]
Environmental Factors:
As with the 1st basis you'll need a fair bit of space between yourself and the mob, but not necessarily that much. The zones you choose to solo in should also not have other things that can easily aggro you and kill you in the process (which is actually rather duh).
[red]Technique: BP-kiting[/red]
BP-kiting, or Blood Pact-kiting is basically Carby-kiting except that Blood Pacts are involved. The crux of BP-kiting is basically to sic an avatar on the mob and make it do its most powerful BP for damage. You can then run a short distance to your next kiting position and repeat. If you've not noticed by now, BP-kiting is very MP-intensive and most fights require for the SMN to start with full MP.
Soloing mobs by BP-kiting in 10 Easy Steps:
1) Go to a safe spot. 2) Summon your avatar. 3) Run near to the mob. 4) Use your Blood Pact on the mob. (You may also choose to Assault first, not much difference.) 5) Run away for a considerable distance. 6) Wait awhile. (Usually until your BP timer is almost up) 7)Dismiss your avatar. (You may also choose to let the avatar die naturally. Situation and MP dependant) 8) Summon your avatar again. 9) Allow your avatar to engage the mob once again. 10) Repeat steps 4-10 until the mob is dead.
[purple]Astralburn: Simply zerging the mob with Rage BPs sometimes work, depending on the number of people, to the extent that there is absolutely no need to kite.[/purple]
Soloing Notes:
> When MP permits or if your avatar is hardy enough against the mob, you can proceed to fire off your 2nd BP in the same casting of that avatar. Also, if the mob is near death, its more efficient to just let your avatar melee it down (assuming your avatar can last that long)
> If you realise you've run out of MP to continue BP-kiting, you should either Astral Flow to perpetuate the present avatar for free or switch to Carby-kiting for MP efficiency, or both.[hr]
[sea]I - Pots[/sea]
Once SMN hit Lv 70 they are quite proficient with soloing pots using Titan's Mountain Buster due to his enhanced damage on them. You could also try them at 65 with Eclipse Bite and Fenrir. Pots can be dangerous due to them casting magic and their TP moves. It is recommended to BP-kite them.
Soloing Notes:
> Pots are weak to blunt and impact weapons. As such, Mountain Buster, Chaotic Strike and Rush will have enhanced damage on them. Mountain Buster is arguably the best as it is a 1 hit BP and this reduces the chance of not dealing full damage from 1 hit. Rush is therefore arguably the worst.
> Avoid Ro'Maeve for soloing pots if you want to live. That place is aggro heaven for SMN since everything aggros to magic.
> Pots are arcana and aggro magic. They can cast strong elemental spells and have TP-moves that nullify magic damage as well as give gravity.
Recommended Spots: Ru'Aun Gardens Pots - Somepage listing[hr]
[sea]II - Beastmen Pets[/sea]
These mobs are not only a favourite target of soloing SMN but many other jobs too. BST job Beastmen have mobs that are often much weaker than their family equivalent at the same level but garner as much EXP. There is a trick to pull the pet only without aggroing the master, which is usually when the master is facing away from the pet (this varies). Most prefer rabbits and bats.
Soloing Notes:
> Beastmen Pets usually have very short HP and die quickly. Predator Claws and Eclipse Bite are usually the better BPs to use.
> The important thing to note when killing these is that you do NOT want their masters to aggro you as well, so its usually best to pull the pet with a ranged attack or spell (or maybe Carbuncle) and then kill it when it's been isolated from its master.
> Elementals and wyverns are not recommended for this practice as they don't usually die that easily. I am unable to comment on automatons at the moment.
> You may also kill Beastmen Pets at lower levels using the weaker blood pacts.
> Beastmen pets do not usually aggro unless when linked with their master. Mobs from their family usually link with beastmen pets though.
Recommended Spots:
Lv 66-69 - Goblin's Rarab @ Bibiki Bay
Lower Delkfutt Tower Yhoator Jungle Gustav Tunnel Newton Movalpolos Bibiki Bay Various Pets - Somepage listing (note this link is not a hard and fast guide. It's hard to filter a search for beastmen pets)[hr]
[sea]III - Hpemdes[/sea]
Hpemdes require access to Chains of Promathia areas.
This is the goldfish looking mob in Al'Taieu. When fighting them, they tend to switch to a mode where they open their mouth. Their defence at this point is 0! Using Lv70 BPs can almost (if it doesn't actually) one shot the mob, dealing anywhere from 2k to 4+k of damage. These mobs hit hard. If you encounter any problems with these its possible to zone them pretty easily.
Soloing Notes:
> Hpemde are found exclusively in Al'Taieu. You will require CoP Chapter 8 to access this area.
> The best BP to use against Hpemde is Flaming Crush. This is probably because Ifrit has higher base STR (STR relates to fire) and that Flaming Crush is both a physical and fire-based attack.
> Although they do 'aggro and link', Hpemde do not attack unless attacked upon with damage first, so they basically just follow you around for a while. Avatars take this as aggression and automatically attack those that follow you so exercise caution there.
Recommended Spots:
Al'Taieu (only) Hpemde - Somepage listing[hr]
[sea]IV - Imps[/sea]
Imps require access to Treasures of Aht Urhgan areas.
Imps are easy prey for Summoners because they have pathetic HP counts and seem to have awful evasion too. These mobs are frequently hunted by soloing BLU and TP-burn parties.
Soloing Notes:
> Imps have 2 main TP moves, both of which are dangerous to a SMN and your avatar. Deafening Tantara - AoE silence. You can cure this with echo drops. Abrasive Tantara - AoE amnesia. This move makes you unable use any job abilities or pet commands (same goes to avatars.) Some degree of BP-kiting is recommended due to the dangerous AoEs.
> The BP of choice is often Predator Claws for optimal damage. It should be noted tho, that both Ifrit and Leviathan heavily resist Abrasive Tantara's amnesia as it is fire-based. As such, Leviathan may be another popular choice of avatar to use, seeing as he is also more accurate.
> Imps are true sight and aggro.
Recommended Spots:
Caedarva Mire Imps - Somepage listing[hr]
[sea]V - Skeletons[/sea]
Okay, these are actually more exclusive to Astralburn PTs, so I've put them in last.
Astralburn Notes:
> Skeletons are weak to blunt damage, making Titan most desirable due to his fairly consistant 1-hit BP. Also considerable are Ifrit because bones are also weak to fire, and Ramuh because his staff can stun as well.
> Skeletons are sound and blood aggro.
Recommended Spots:
King Ranperre's Tomb[hr]
[sea]Additional Information[/sea]
Essential Macros:
/ma (avatar name) You should always have 1 of these for Carbuncle and at least 1 elemental spirit for emergencies.
/ja Assault Another pretty standard macro you should use.
/ja Release Any good Summoner should have this one by now.
/ta This one is useful to check the distance between you and the mob, and when after Carby is dead, to check if anything is coming at you. Note that its effective distance is as far as you can see Carbuncles Pet HP bar.
/ma Blink/Stoneskin Assuming you're using WHM sub, it's useful to have these buffs up sometimes, and when you know you need it, you'll want it up asap.
Notable Buffs:
Reraise - because accidents can happen. Protect/Shell - never hurts. Blink - good when soloing bombs. This buys you time for Carby to steal it back from you. Stoneskin - helps to take damage. Barfire/Barblizzard - when you're soloing stuff that blow up, the added elemental resistance can save your life if you're caught in the wrong place at the wrong time[hr]
Thanks to all the posters who've contributed to making this thread more useful, to the mods for sticky, and to the people who appreciate this guide =p I've noticed that not only has my post has been referenced/quoted in other forums, this thread is the most viewed in the whole of the KI Summoner board (other than post pics thread). Thanks for the recognition.
Spira SMN75 Ragnarok [hr] credits to Tomiko and Cendus for providing some maps.
edit 1.1: updating info and compiling the guides onto OP for easier reference. edit 1.2: more updating (03-04-05). Thanks to mods for sticky. edit 1.3: a little moreupdating (02-07-05) edit 1.4: added misc info on other mobs that SMN can solo (10-08-05) edit 1.41: changed the title, as suggested by kuropiko =p (12-08-05) edit 1.5: redid the text a little, updated Uleguerand bestiary. (16-09-05) making new maps soon =O edit 1.6: reworked some text, added new ifrits map. (08-10-05) edit 1.7: eq list edit 1.8: simple ule map up (061205) edit 1.9: removed tp-zoning section related to specific changes due to mpk countermeasure. added extra info on bomb beastiary. cleaned section about bomb tp moves. (140206) edit 1.95: added somepage search link for mob database accordingly for all soloable mobs. added beastmen pet. (230506) edit 2.0: revamped the entire format of my post. removed the astralburn section as well. I will be making a separate thread on smn and pts. (300806) edit 2.01: slight revisions.(290906) edit 2.1: added info for astralburn on request. still not fully satisfied with it but it seems better now.(030307) edit 2.2: added info on Djinn and reworked abit of text. changed the title of the thread again.(071207) edit 2.3: added more info on Djinn and updated maps. (111207) edit 2.4: removed Djinn because they were nerfed (030108) edit 2.5: reinstated Djinn section slightly edited on request (160108) edit 2.51: added Yajirobe's notes (180108)
Source entry: Spira's Summoner Soloing Guide. Cached on this server on 4 November 2026.